


In one of the last stories we learned how to create a DigiByte Full node with a Rock64. Now you’re standing with this brand new node and wondering if you could make it mine some $DGB? Or simply, you just own a Rock64 and are wondering why it wouldn’t mine a bit, yes every coin count! Here is a small step by step guide.
The Rock64 has a Quad-Core ARM Cortex a53 64-bit that you could easily be used to catch few more $DGB
CPU mining are you serious?
Why not? The Rock64 is powered by a Quad-Core ARM Cortex A53 64-Bit Processor, you have this amazing bit of technology just sleeping in this small box next to you. All this asset of silicon you paid good money for without using it… what a shame…
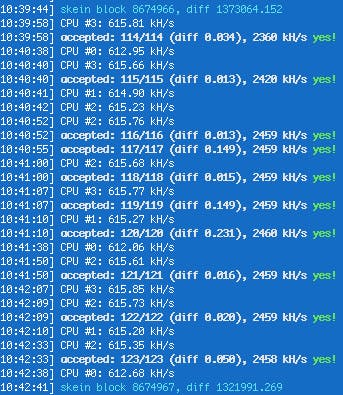
The Rock64 grabbed few shares and is running actually at about 2,45 MH/s with skein algo
Ok seriously, you won’t do any profit of it, far from it. But CPU mining is fun and still support the network.
How to buy the right hardware?
This guide is based on using a Rock64 with 4GB RAM from Pine64.
Rock64 do exists with different RAM option, you may experiment with different RAM options, event I never tried them before.
First of all, you need to get a Rock64 with 4GB RAM form here : https://store.pine64.org/?product=rock64-media-board-computer
I advice you to add these :
- Rock’s 5V 3A Switching Power Supply (beware it is a specific power supply)
- A nice casing for protection and show off
- 16GB Class10 Micro SD card
- A Micro SD card reader for your PC
- HDMI cable
- Network cable to connect it to your router
- A temporary computer screen or TV
- A temporary Keyboard and Mouse
I ordered mine directly from https://pine64.org and it was a fast and a smooth experience.
Let’s begin
Once you’ve got the hardware, it’ll be the time to install the operating system on the Rock64. Pine is providing a installer that is pretty easy to use and that works on the biggest OS.
- Download the PINE64 Installer here : https://github.com/pine64dev/PINE64-Installer/blob/master/README.md#download
Now it’s time to launch the PIN64 Installer and to plug your Micro SD into your PC.
- First step Choose your OS, at this stage, you’ll have to select “Rock64 -v3/v2 and Armbian Ubuntu 18.04 Bionic Desktop(Rock64 mciroSD / eMMC). If you want to play more easily with your Rock64 I recommend you to choose the desktop edition and not the minimal one.
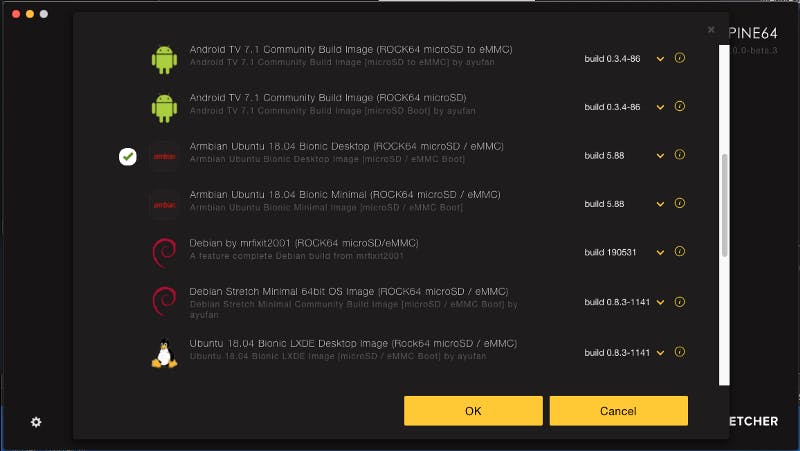
Choose the desktop edition if you like to connect graphically to your Rock64
- And choose your SD card by clicking on connect a Drive
- Last step Flash! Introduce your password if asked and the software will download the OS and flash your sd card for you. This step can be a bit long depending on your Internet connection.
Booting up your Rock64
Now you’re ready, attach your monitor, the keyboard, the mouse and the network to your Rock64, pop in the Micro SD card in the slot and plug the power.

The wallpaper of your OS
There are two solid lights displayed on the board (a white and a red), nothing will flicker but your OS should display the boot sequence on the screen.
Soon you’ll be asked for a password, the default user and password are
- user : root
- password : 1234
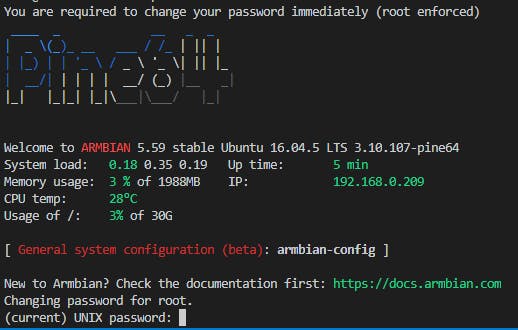
Choose your password wisely, it shouldn’t be easy to guess as your Rock64 could be Internet facing, and write it down somewhere, you don’t want to loose it.
After this step you’ll have to choose a user name and a specific password for it. I did choose drake for my user, so when this guide will reference drake you should input your user name.
Time to connect your Rock64 through an SSH connection
First you’ll have to know which IP address has been given to your Rock64. Open a terminal window and type :
sudo ifconfig
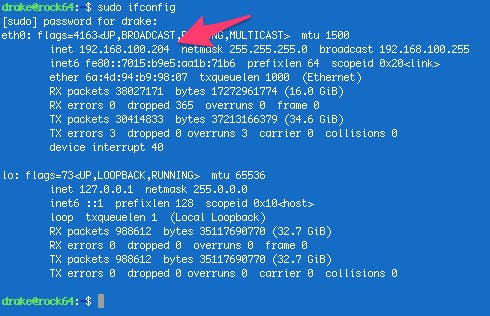
Output for ifconfig
You’ll have to enter the password of your account and should receive an output looking like the one just above. We are looking for the IP address of the eth0 network card.
If you’re using a Mac or a Linux a SSH client is available directly in your Terminal window by entering
ssh drake@192.168.100.204
Where drake will be your Rock64’s user name and 192.168.100.204 should be replaced with the Rock64’s address IP. You’ll be asked if you accept the connection, just answer yes and provide the user’s password. You should see something like this:
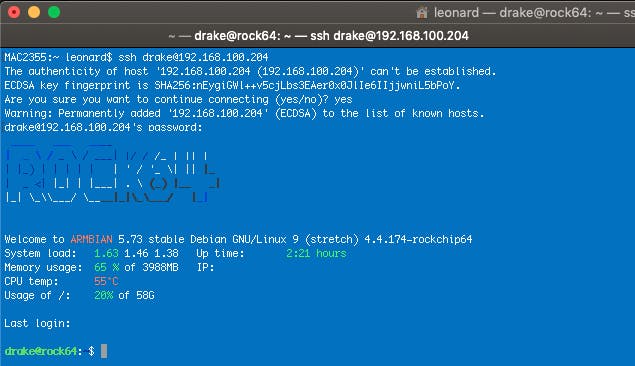
First SSH Connexion to the Rock64
If you’re using a PC, you should download Putty from here: https://www.chiark.greenend.org.uk/~sgtatham/putty/latest.html
In Putty fill-in the Rock’s IP address choose SSH and click on Open.
How to manage your Rock64 remotely with a graphical interface?
If you’re interested in using a secure VNC to remote control your Rock64 with a graphical interface, this is the guide you need:
https://link.medium.com/DbcoJR0gtW
Increasing the Swap Space
Swap Space is a place where memory is copied to the hard drive if it need more, it is called virtual memory.
The Armbian Debian has been set with 1GB swap memory. We’ll increase it by 8GB: just copy/paste these 3 commands
sudo fallocate -l 8G /swap
sudo mkswap /swap
sudo swapon /swap
We can verify this using this command
free -hm

9GB Swap Space, more than what we need :)
Make it mine !
And it is just so easy to make it mine, you are few commands away, so why not doing it? First just download the right dependencies:
sudo apt-get install git automake autoconf pkg-config libcurl4-openssl-dev libjansson-dev libssl-dev libgmp-dev make g++
sudo apt-get install zlib1g-dev
Now we are downloading the software we need:
cd ~
git clone [https://github.com/tpruvot/cpuminer-multi.git](https://github.com/tpruvot/cpuminer-multi.git)
cd cpuminer-multi/

Downloading the cpuminer we’ll use
Hopefully, we are using a Rock64 and it is pretty easy to compile the tool:
./autogen.sh

./configure --disable-assembly CFLAGS="-Ofast -march=native" --with-crypto --with-curl
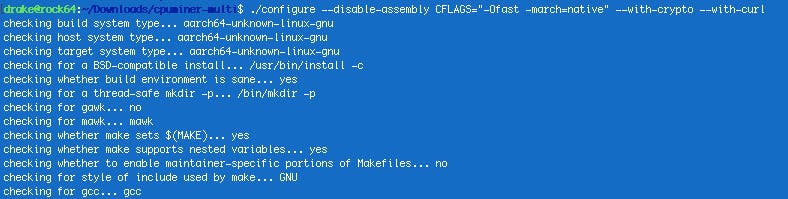
Next we can run make and make install to finish this part:
sudo make
sudo make install
To make it easy to start the miner, just create a symbolic link this way:
sudo ln -s ~/cpuminer-multi/cpuminer /usr/bin/cpuminer
CPU mining on a Pool
The miningfield.com pool support mining DigiByte with your CPU using the skein algorithm. Just open an account and create a worker for your Rock64.
Configuring the miner
Take these few simple steps to configure your miner. Here also mind to replace the username by the pool’s username, worker_name by your worker’s name and off course worker_password with the password you did choose for this worker.
cat << EOF > ~/start\_cpuminer.sh
cpuminer --algo=skein -o stratum+tcp://eu.miningfield.com:3394 -O username.worker\_name:worker\_password
EOF

Running your miner
Just run the command ./start_cpuminer.sh directly from your home folder to start your miner. You should see something like this:
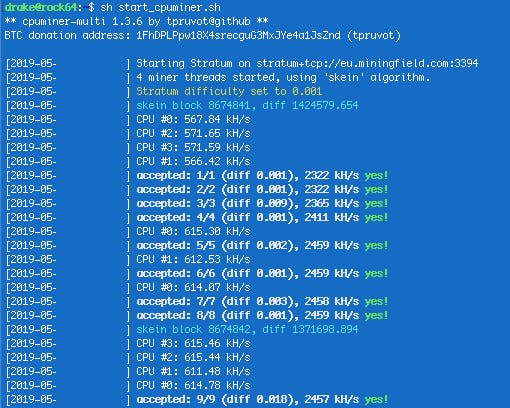
After few instants you should already see some shares accepted
Overclocking the Rock64
Beware this part is for information and testing only, keep in mind that you can break your board depending on what you’re asking it for or if it overheats.
By default your Rock64 has a max CPU frequency set to 1.3GHz max. Check your current CPU frequency with:
cpufreq-info -c 0
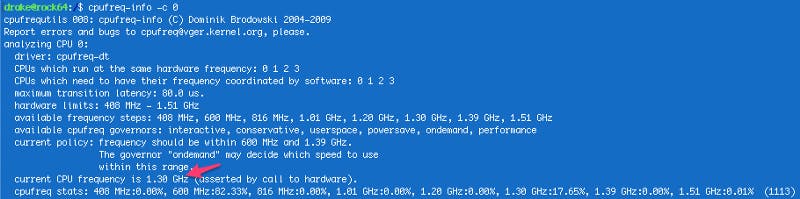
Actually this Rock64 can go up to 1.30GHz
No need to reboot, we can slightly bump this settings while mining to 1.51GHz using these commands:
sudo sed -i "s/MAX\_SPEED=.\*/MAX\_SPEED=1512000/" /etc/default/cpufrequtils

sudo systemctl restart cpufrequtils
Now the Rock64 can increase itself its CPU frequecy up to 1.51GHz if it needs it.

Now the Rock64 can run at 1.51GHz
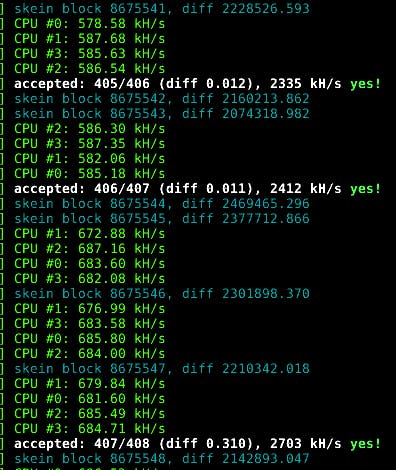
You can directly notice the bump in KH/s (about 15% more hashes)
If you want to try different settings, you can get the list of the accepted frequencies by using this command:
cat /sys/devices/system/cpu/cpufreq/policy0/scaling\_available\_frequencies

Rock’s available scaling frequencies
If you like to go back to the previous settings, just use these commands:
sudo sed -i "s/MAX\_SPEED=.\*/MAX\_SPEED=1296000/" /etc/default/cpufrequtils

sudo systemctl restart cpufrequtils
Check the temperature of your Rock64
You can check the CPU temperature with this command:
sudo armbianmonitor -m
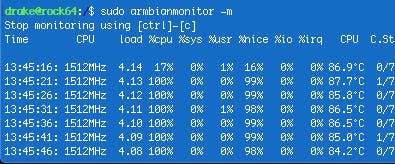
87.7°C is too hot for you CPU, you better aim for 79°C max
I don’t have a big enough heatsink on my CPU and the 1512000 max-speed setting was a bit too much, so I did choose 1392000 setting which my Rock64 seems to appreciate much more.
Graphically monitor your Rock64 with SSH and s-tui
s-tui is a terminal, graphical User Interface for monitoring your computer.It allows monitoring CPU temperature, frequency and utilization. It is developed in Python and also requires minimal resources and it is possible to run it through a SSH connection.
It is pretty straightforward to install, just enter these commands to install and detect the sensors:
sudo apt-get install lm-sensors
sudo sensors-detect
Say yes to all questions and carry on with these commands that will install s-tui:
sudo apt-get install python3-pip stress
sudo apt-get install python3-dev

sudo -H pip3 install --upgrade setuptools
sudo -H pip3 install ez\_setup
sudo -H pip3 install s-tui
Now it has been installed, to launch it:
sudo s-tui
If you want to have all the information, you have to run s-tui with sudo.
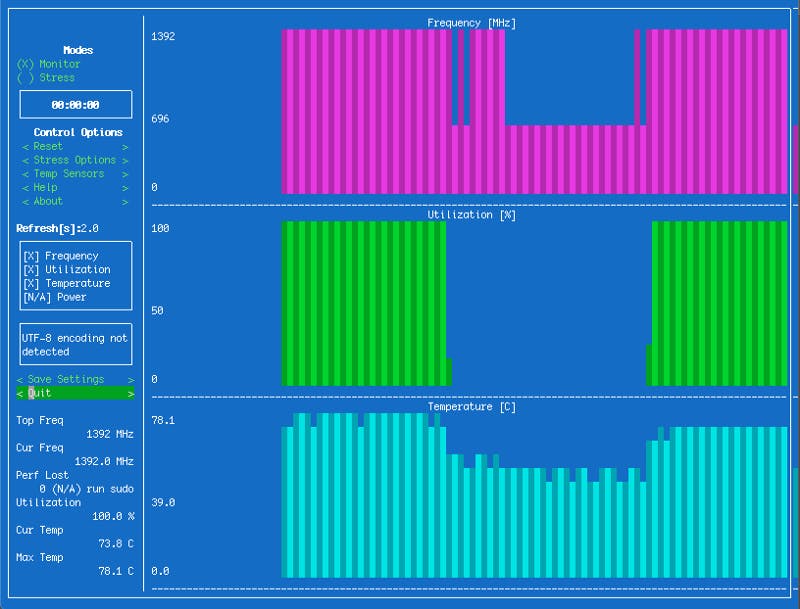
Too bad the Rock64 has no Power sensor
Make your CPUminer restart automatically after a reboot
This part might seem just a bit more techy, but if you copy and paste the following commands, it should be easy enough to set that up.
First of all we create the service file by using this command, don’t forget to adapt this command with your username:
sudo cat << EOF > ~/cpuminer.service
\[Unit\]
Description= CPUminer (digibyte)
After=syslog.target network.target
\[Service\]
Type=simple
User=drake
PAMName=login
ExecStart=/home/**your\_user\_name**/start\_cpuminer.sh
\[Install\]
WantedBy=multi-user.target
EOF
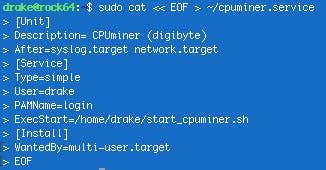
The service file has been created in your home folder
Then we change the owner and move the file in the right place:
sudo chown root:root cpuminer.service
sudo mv ~/cpuminer.service /etc/systemd/system/
sudo chmod 755 /etc/systemd/system/cpuminer.service
chmod 755 ~/start\_cpuminer.sh
You can check if the file is at the right place with this command:
sudo ls -ail /etc/systemd/system/
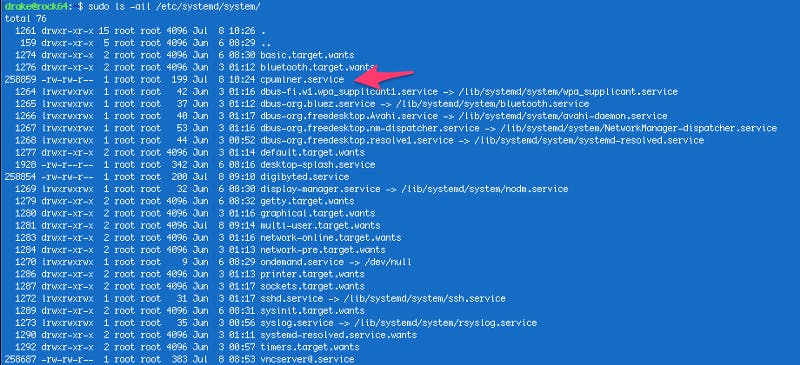
The file should be displayed here
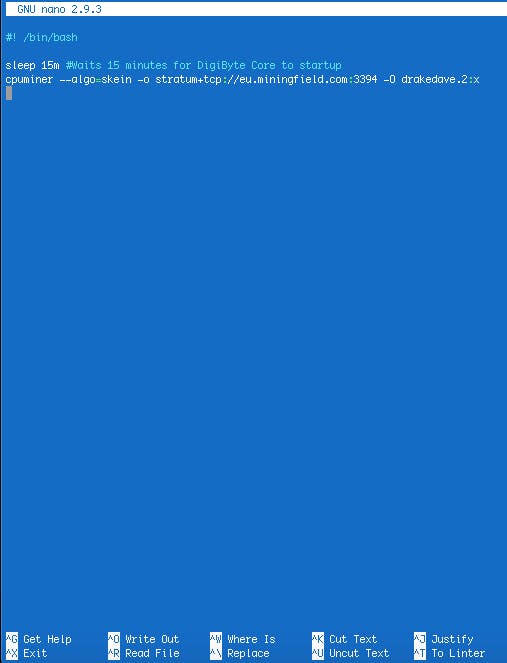
Adapt your start_cpuminer.sh to start the cpuminer few minutes after the reboot
This is interesting for example if your are running a Digibyte Full node on this device. The full node will take between 10 and 15 minutes to read all the local copy of the blockchain and get the difference. It might be interesting that the Rock64 let a bit of CPU for this task. You might start your cpuminer few minutes later by modifying the start_cpuminer.sh in your home folder.
Just add this line befor the cpuminer command to your start_cpuminer.sh
nano ~/start\_cpuminer.sh

#! /bin/bash

sleep 15m #Waits 15 minutes for DigiByte Core to startup
Verify that your service is runing
sudo service cpuminer stop
sudo service cpuminer start
sudo service cpuminer status

The cpuminer.service is active and running, in 15 minutes the cpuminer will start
Conclusion
Now you have a Rock64 mining DigiByte using Skein algorithm, I let you experiment with different algo and coins. If you’ve followed my previous posts your Rock64 is already a full DigiByte node. But if you did not and are interested in making your Rock64 a DigiByte Full Node, just check this link.